Here, grilling should be a fun way to cook up great-tasting food, but even seasoned backyard chefs mess up by letting temperature control slip.
If you’ve ever ended up with a burnt outside and raw inside, you’re definitely not alone. That’s a really common beginner slip, one I made more times than I’d like to admit when I was starting. The truth is, temperature control matters more than recipes. Grilling is all about balancing heat. That’s how you get the crust, keep the inside juicy, and, honestly, keep your friends safe from undercooked chicken. Once I started paying attention to temperatures instead of just flipping meat by feel, my results changed in a big way.
Here are the real insights that run through an everyday grillmaster’s mapped playbook, especially the ones beginners often miss.
Why Temperature Is Everything in BBQ
It’s simple and tempting to crank up the heat and “eyeball” everything. But if you want juicy, flavorful food every time, not hockey pucks or surprise pink chicken, temperature control is key. Heat affects how meat browns, how moist it stays, and whether it’s even safe to eat. If the grill is too hot, you’ll burn the outside before the inside cooks. Not hot enough, and your food dries out or ends up rubbery. I once tried to grill chicken thighs “by feel,” only to find pink juices inside, more than once! Now I know: heat isn’t just for flavor. It’s about food safety, texture, and getting that perfect bite.
As one pitmaster puts it: “Temperature control matters more than recipes.” That’s what separates good BBQ from some simply great BBQ. Here, one of the biggest beginner mistakes isn’t about seasoning or fancy cuts. It almost always comes back to either letting the heat run wild or guessing when things are ready.
The #1 Beginner Mistake: Guessing Instead of Measuring
If anything, there’s one thing I see new grillers do all the time: guessing at temperatures. Sometimes this looks like waving your hand over the grill to “feel” the heat, or watching for grill marks and hoping the inside is ready and cooked. When I skipped using my thermometer, I’d flip steaks by time or color, which left them nearly raw in the center or way past done.
“Stop cooking blind.” Relying on cook times or color alone is a gamble. Most doneness errors actually come from guessing at temperature. Using a simple grill thermometer makes a huge difference. It’s not about fancy gadgets; a reliable instant-read thermometer is one of my favorite grilling upgrades. Flare-ups can make people think they’re searing when the heat isn’t high enough to reach the temperature needed for a good crust. Trust the numbers instead of instincts until you’ve dialed in your process. I still use a thermometer on everything, from steaks and chicken to tenderloins and much more.
Understanding Grill Temperature Zones (Foundation Skill)
Managing your grill means dividing up the heat, so you’re not at the mercy of whatever fire you get. “Control the fire, don’t let it control you.” That advice finally made multizone cooking click for me. Here’s how the basics work:
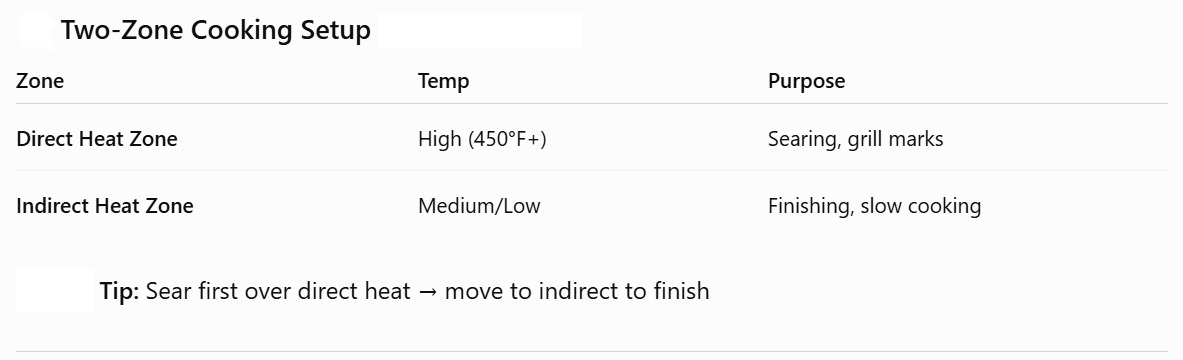
- Direct heat is right over the flame or coals. This spot is best for searing; think steaks, burgers, shrimp, or getting grill marks.
- Indirect heat is where you cook with gentler heat, off to the side of the flame or with burners turned off. Here, this is the zone for slow-cooking chicken or finishing thicker cuts after a good sear.
It’s setting up a two-zone fire, which isn’t complicated. On a charcoal grill, pile coals on one half and leave the other clear. On gas grills, turn on half the burners (for direct), and leave the rest off (for indirect). A simple method is to start with direct heat for searing, then move large pieces to indirect heat so they cook through without burning. It’s a simple technique and is the cornerstone of grill reliability. It also helps avoid stress when things flare up.
Target Temperatures Every Beginner Should Know
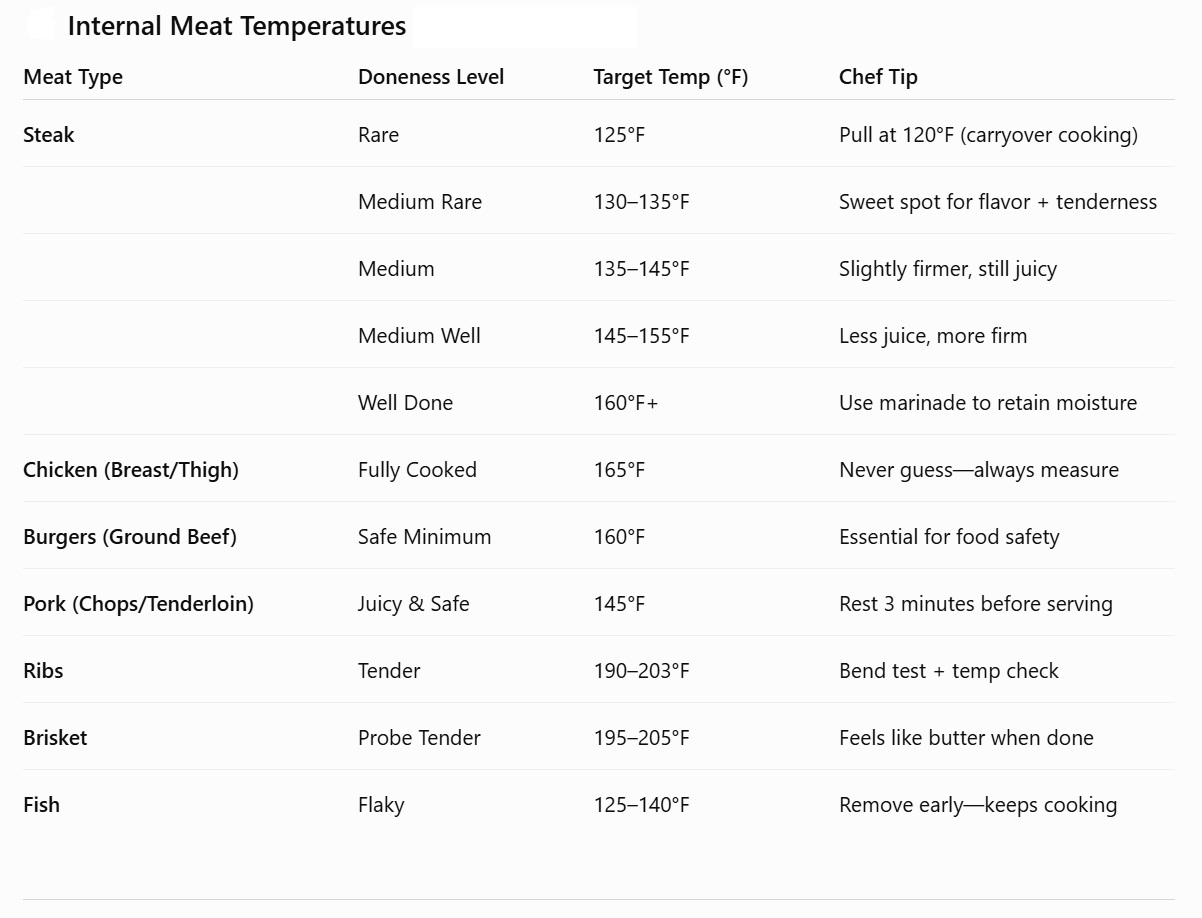
“Cook to temperature, not time.” It’s a simple tip from every chef I trust, especially in BBQ. Here’s a cheat sheet I always keep near my grill. These temps are for the internal temperature of the meat as measured by your instant-read thermometer:
- Chicken: 165°F (no exceptions; safety first!)
- Burgers: 160°F
- Steak: Rare 125°F; Medium 135°F; Medium well 145°F
- Pork (chops, loin): 145°F
Another tip: most chefs pull their meat off the grill about 5°F before the target temperature, since the temp will rise a few degrees as it rests (that’s “carryover cooking”). That way, you’ll hit the sweet spot instead of overdoing it. If you’re new to this, use the thermometer every single time; seriously, it’s super important.
Preheating: The Step Most Beginners Skip
“If your grill isn’t hot, you’re already behind.” Preheating your grill is like preheating the oven; skipping it often leads to stuck-on food or limp veggies. When you start with a cold grill, meat sticks, searing doesn’t happen, and you risk picking up off flavors from old residue. Preheating also helps kill leftover bacteria on the grates, which is a bonus for cleanliness!
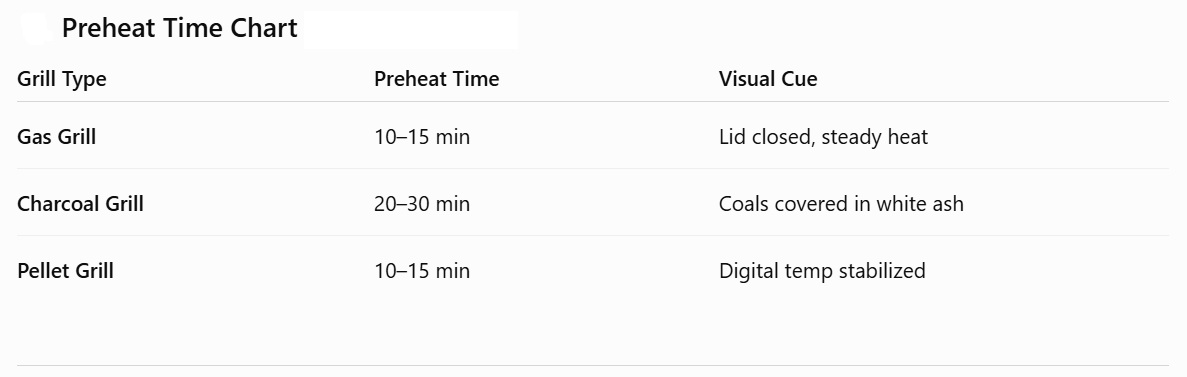
Recommended preheat times:
- Gas grill: 10 to 15 minutes after ignition, lid closed
- Charcoal: 20 to 30 minutes, until coals are ashed over and glowing
- Pellet: 10 to 15 minutes after the startup cycle
I always look for a steady, shimmering heat and then, importantly, clean grates before dropping food on. If things aren’t hot enough to steam a drop of water, give it another few minutes. That makes the difference between grill marks and a sad, pale steak.
Managing Heat: Adjusting Without Overreacting
Here, managing the grill heat is more about small tweaks than big moves. “Small adjustments beat big swings.” Leave the lid open, and you’ll lose heat fast; close it for too long, and you risk uneven cooking. I learned to resist the urge to flip food or constantly peek under the lid; every time you open it, you let heat escape.
For charcoal users: airflow is your best friend. Here, opening the bottom vent brings in more oxygen (hotter fire), and closing it makes things cook more slowly. The top vents help control smoke and draw. You don’t need to fuss constantly; find the balance, then leave it to do its work. Here, just calmly transferring food from direct to indirect heat will help prevent flare-ups. A little patience goes a long way.
Internal vs External Temperature (Game Changer Concept)
Yes, here’s a trick that changed my grilling for good: “Grill temp cooks the outside, internal temp tells the truth.” It doesn’t matter if your grill is raging at 500°F; what matters most is the temp at the center of what you’re cooking. The grill thermometer or the built-in gauge tells you external temp (the air or grill grate), but the instant-read thermometer shows how the inside is doing. For doneness, internal temp is the real deal.
Use an instant-read thermometer for quick checks when the food gets almost done. For big roasts or BBQ low-and-slow cuts, I sometimes use a leave-in probe thermometer, so you can watch the temp climb without opening the grill. It is a super useful hack if you’re working with Brisket, pork butt, or chicken spatchcocked over the coals.
Searing vs Slow Cooking: When Temperature Strategy Changes
Actually, high heat isn’t the answer for every food. Here’s a fast breakdown:
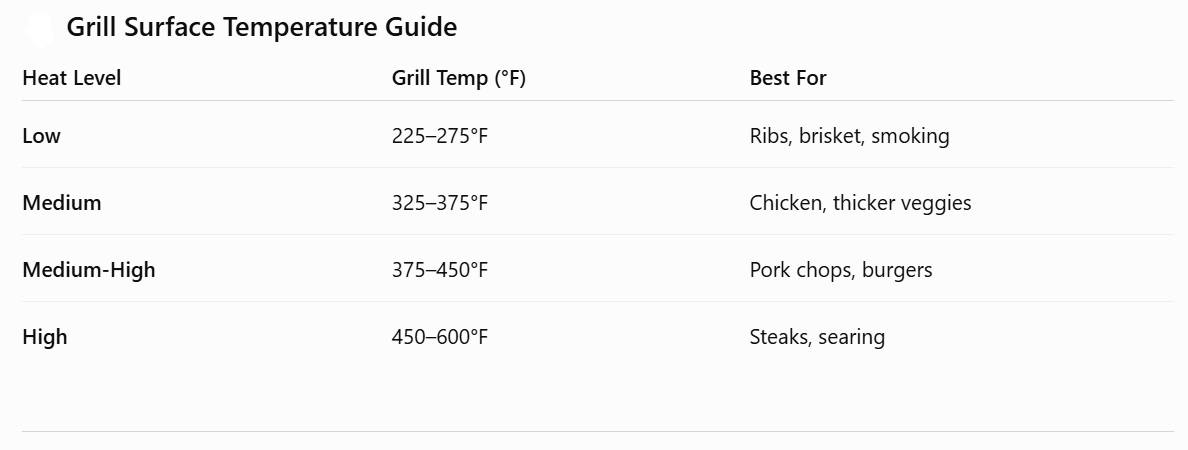
- High heat (450 to 600°F): This is perfect for a quick, hard sear on steaks, burgers, and seafood. You get that caramelized crust in just a few minutes per side.
- Medium heat (350 to 450°F): Great for chicken pieces, whole veggies, or delicate fish fillets. Nothing incinerates, and you avoid tough, dry bites.
- Low and slow (225 to 275°F): Ribs, Brisket, pork butt, or massive roasts get tender and soak up smoke at these temps if your grill setup allows.
One “advanced but doable” move for beginners: try the reverse sear method. Slowly cook your steak or thick chop over indirect heat to the right internal temp (about 110°F to 120°F for steak), then finish over high, direct heat for a beautiful crust. This method is almost foolproof and makes really juicy meat.
Timing + Temperature = Perfect Results
“Timing supports temperature, not the other way around.” I used to watch the clock, timer, or stopwatch and turn my food when the minutes were up, but it turns out time alone isn’t much use. Pieces vary in thickness, weather can affect how quickly things cook, and different grills can run hotter or cooler from day to day, depending on outside temperatures. Use temperature checkpoints—a quick probe every so often—to keep things on track.
- Start checking internal temps at the halfway mark for thicker cuts.
- When your thermometer reads 5°F below the target temp, pull the food off and tent it with foil.
- Let it rest for at least 5 minutes (longer for large cuts); this lets the juices redistribute, so every bite stays juicy rather than dry around the edges.
Environmental Factors Most Beginners Ignore
“Your grill doesn’t cook in a vacuum.” Outdoor cooking has real-world quirks that kitchen cooking never faces. Wind, cold, humidity, and even a blazing summer sun will all impact your grill’s performance. I learned this the hard way on a windy afternoon; my burgers took twice as long to cook, and my grill burned through fuel quickly. What is needed here is to adjust the air vents or turn up the burners in cold, windy weather. On hot days, keep the grill shaded if you can, and monitor those temperatures. Grilling on a covered patio helps even things out, but be ready to adapt to the weather.
Advanced Tip: Layering Heat for Flavor Development
A great BBQ gets built in stages. “Great BBQ uses multiple temperature stages.” Smoking or roasting at lower temps helps meat soak up more smoke and stay tender inside. Then, moving food to a hotter zone at the end builds a flavorful crust or caramelization. For ribs, for example, I start them over indirect, low heat for two hours, then finish them over direct, high heat for that signature stickiness (and add a sauce of choice, at times). This combo technique is the foundation of a lot of BBQ, so don’t be afraid to play around with indirect-to-direct transitions in your favorite recipes (your signature style for taste). Even veggies taste better with a short high-heat finish after they’ve gone soft on the cooler side.
Pro Level Trick: “Feel vs Thermometer” (Bridging Skill)
“Eventually, you’ll feel doneness, but earn it first.” As experience grows, as grillers, you sometimes judge steak or burger doneness by touch (the springiness of the meat). If you’ve seen chefs poke a steak and nod, here’s what they’re doing:
- Soft, squishy: Rare
- Slightly firm with some bounce: Medium
- Firm: Well done
You can try pressing your thumb to your different fingers (index finger = rare, pinky = well done) as a loose guide, but honestly, nothing beats a thermometer when you’re learning. Note the visual clues (clear juices, color, crust) help, but use the probe until you’ve cooked a hundred steaks. It keeps you honest and boosts your confidence in cooking.
Quick Reference Temperature Cheat Sheet
- Grill Surface Temps:
-
- Low: 225 to 275°F
- Medium: 350 to 450°F
- High: 450 to 600°F
- Internal Meat Temps:
-
- Chicken: 165°F
- Burgers: 160°F
- Steak: Rare 125°F, Medium 135°F, Medium well 145°F
- Pork: 145°F
- Preheat Times:
-
- Gas Pellet: 10 to 15 min
- Charcoal: 20 to 30 min
Common Temperature Mistakes
- Not preheating the grill
- Cooking by time instead of temp
- Opening the lid too often (heat loss!)
- Not letting meat rest
- Using only visual cues or gut feelings
Pro Tips from Chefs
- “Temperature control beats fancy recipes every time.”
- “If you’re guessing, you’re overcooking.”
- “Use a thermometer until instinct kicks in.”
From Guesswork to Precision: Final Thoughts
Here, moving from guesswork to consistent precision turns a grilling rookie into a confident cook. Once you stop thinking of temperature as something mysterious or complicated, grilling gets a lot easier and way more fun. Here, control the temps, check with your thermometer, and don’t stress over the occasional miss. Every cookout is a chance to fine-tune your skills. Keep practicing, trust the numbers, and grilling will start feeling a whole lot more foolproof every time.
Mastering BBQ grill temperatures is essential for achieving perfect results, whether you’re a beginner or a seasoned pitmaster. Here, yes, many people make the common mistake of focusing on recipes and flavors while overlooking the importance of heat control.
It’s that the right temperature ensures your food is ready cooked evenly—no more burnt exteriors with raw centers.
Here, the proper temperature management not only develops rich flavors and tender textures but also keeps your BBQ safe to eat.
Understanding and controlling grill temperatures are key skills for a great BBQ.
Here, once you prioritize temperature, every other aspect of barbecuing becomes easier and more successful.
Enjoy that great BBQ taste!