Here, BBQ season is awesome, it’s the simple grilling taste, flavor, and fun, but cleaning up after that perfect grilled meal isn’t always the highlight. Luckily, keeping your gas grill in top shape doesn’t need to feel like a never-ending chore.
Here, with the right approach and a bit of know-how, you can reduce scrubbing time and keep your grill performing well for years. I’m sharing my favorite simple strategies for BBQ cleanup and maintenance on gas grills, whether you’re a weekend griller or a backyard barbecue champ/
Why Regular Gas Grill Maintenance Matters
Yes, it’s simple; grilling isn’t just about smoky burgers or charred corn; it’s about a trusty grill that fires up when you need it. Skipping regular cleanup leads to grease buildup, stubborn stuck-on bits, reduced cooking performance, and even potential flare-ups. I’ve had friends ask why their grill doesn’t heat evenly or why the grates get sticky so quickly, and most of the time, it’s simply a cleaning and maintenance thing.
Routine care helps your gas grill last longer and keeps every BBQ session easier and safer. Spending a few extra minutes before and after grilling saves you from a heavy-duty, messy cleaning session down the line. Without this care, grates can seize up, burners clog, and even the tastiest meals run into trouble.
Understanding Your Gas Grill: Key Parts You’ll Clean
Knowing the main grill parts helps a lot with proper cleaning and troubleshooting. If you picture your grill’s structure, there are a few essential elements to pay close attention to.
- Grates: Where the food goes. These collect drippings and food residue fast.
- Burner Tubes: The gas source below the grates. Clogs here mean uneven heating. Always keep these clear by brushing away any grease or ash.
- Flavorizer Bars (or Flame Tamers): Metal plates that sit above burners, catch drips, and convert them to smoke, adding extra flavor to your food. These also need to be clear and free of excess gunk.
- Grease Tray/Drip Pan: Sits underneath to catch grease. Needs regular emptying to prevent overflow and dangerous flare-ups.
- Firebox: The lower body holds everything together. Debris can collect here and impact overall performance.
Understanding what each part does makes the cleaning process less overwhelming. If you’re ever unsure where to start, your grill manual often includes diagrams and helpful tips for identifying and locating these parts.
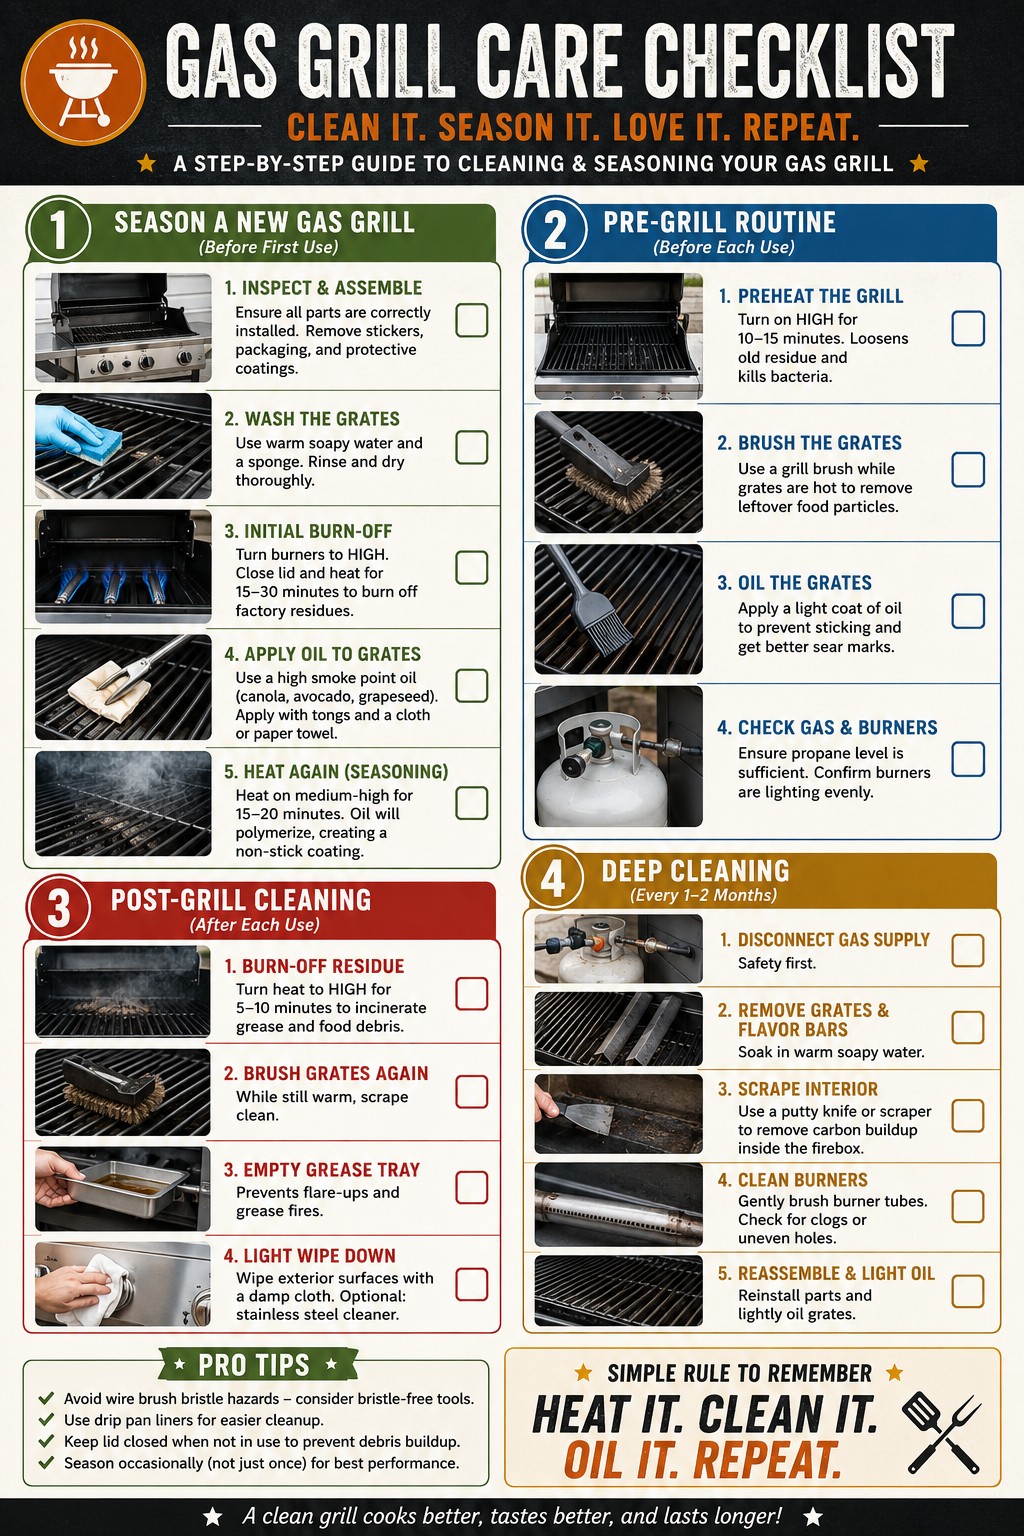
Step-by-Step Guide to Cleaning & Seasoning a Gas Grill
Here, in addition to following the manufacturer’s guidelines, I break down my gas grill cleanup and seasoning process into four main routines: seasoning before first use, pre-grill routine, post-grill cleaning, and a deep cleaning every month or two. Following these steps keeps cleaning stress low and grill flavors high.
1. How to Season a New Gas Grill (Before First Use)
Seasoning isn’t just something you do with cast iron; it works just as well for a new gas grill. Not only does it burn off manufacturing residues, but it also lays down a first nonstick coating that makes later cleanups easier.
- Inspect & Assemble
Make sure all the grill parts are where they need to be. Take off any stickers, packaging bits, or protective coatings (sometimes you’ll find plastic covers on the cooking grates; these are definitely not heat-safe!). - Wash the Grates
I always wash the grates with warm soapy water and a sponge, then rinse and dry thoroughly. Here, you’re washing away dust and oils from the factory. - Perform Initial Burn-Off
With the grates back on, I turn all burners to high, close the lid, and let the grill heat for 15–30 minutes. You’ll notice smoke as any remaining factory residues burn away. - Apply Oil to Grates
Use tongs with a folded paper towel or cloth dipped in a high-smoke-point oil (like canola, avocado, or grapeseed) to wipe down the grates. This step gives you the first layer of protection. - Heat Again (Seasoning Process)
Fire up the grill to medium-high for about 15–20 minutes to let the oil bond to the metal grates. A slightly darker color is great. Repeating this once in a while keeps grates super easy to clean and helps food release more easily.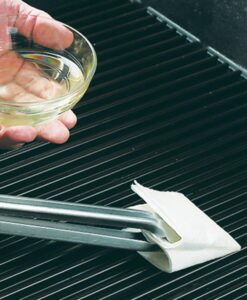
Applying Oil to the grates prevents ‘sticky’ ease of rotation, flipping.

It’s tempting to skip this step, but a quick first seasoning really pays off later.
2. Pre-Grill Routine (Before Each Use)
A simple, quick routine gets each barbecue session off to the right start and sets you up for easier cleaning after, too.
- Preheat the Grill
I light the burners too high, close the lid, and let it heat for 10–15 minutes. Here, it preheats the grates for better searing and helps loosen any residue from the previous use. - Brush the Grates
While the grates are hot, I go over them with a grill brush to remove any leftover food or charred bits. - Oil the Grates (Light Coat)
Helps prevent food from sticking and delivers those lovely grill marks. I add a small amount of Oil to a paper towel and wipe the grates with tongs. - Check Gas & Burners
I always check whether there’s enough propane or gas and make sure the burners ignite evenly. This quick check helps prevent mid-cook surprises or sudden flameouts.
Such a habit means tastier food and less post-cooking effort.
3. Post-Grill Cleaning Routine (After Each Use)
Catching grease and debris before they cool is the single best trick for easy cleaning.
Here’s what I do after every grilling session:
- Burn-Off Residue
I turn the burners on high with the lid closed for 5–10 minutes. Here, it incinerates most leftover grease and stuck-on bits, making them easier to brush off. - Brush Grates Again
With the grates still warm, another pass of the grill brush usually removes everything. It’s much easier when the debris hasn’t cooled or hardened into tough lumps. - Empty Grease Tray
Dumping the grease tray or drip pan after every cook is super important to avoid nasty flare-ups. It can get stinky quickly if left full, and even attract critters. - Light Wipe Down
I wipe down the grill’s exterior with a damp cloth or paper towel. If your grill is stainless steel, a little stainless cleaner keeps it extra eye-catching.
This routine keeps the grill ready for your next gathering and prevents long-term buildup.
4. Deep Cleaning (Every 1–2 Months)
If you grill a lot, or notice uneven heating or more smoke than usual, it’s probably time for a deeper clean. But don’t stress; here’s my method:
- Disconnect Gas Supply
Start by shutting off the propane tank or gas line for safety. - Remove Grates & Flavor Bars
Take these out and let them soak in warm, soapy water for about 15–30 minutes. Here, it softens up any stuck food, grease, and built-up crud. - Scrape Interior
With the grates and bars out, I use a putty knife or flat scraper to remove any carbon buildup inside the firebox. Gunk builds up in corners and along the edges, so don’t ignore those spots. - Clean Burners
Burner tubes can clog with debris. I gently brush them with a soft grill brush (avoid metal bristles that shed) and make sure the gas holes are all open. A toothpick, a small drill bit, or even a paper clip works if needed. - Reassemble & Light Oil
Pop everything back in place, give the grates a quick oil (especially after heavy scrubbing), and you’re all set for the next BBQ.
Heavy Cleaning Scrub Scrape
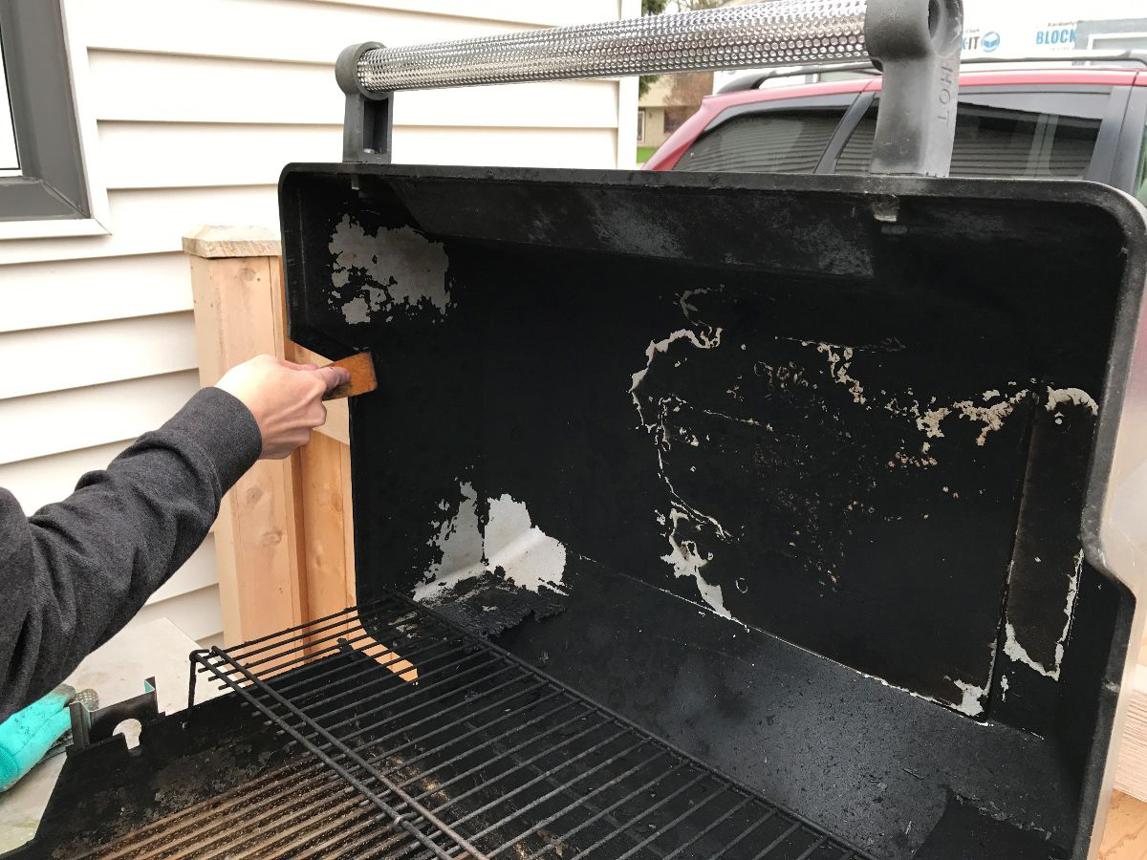
Doing this routine saves money and headaches in the long run, making each cookout a breeze.
Extra Tips for Quick & Trouble-Free Grill Maintenance
- Avoid Wire Brush Bristles. Bristle-free grill brushes or grill stones are safer, so you don’t accidentally get a metal bristle in your food.
- Use Drip Pan Liners. Disposable drip tray liners make cleanup a breeze: pull the liner and toss it after a few cooks.
- Keep the Lid Closed. When finished grilling, closing the lid keeps out dust, pollen, leaves, and wildlife. It’s an easy way to minimize debris buildup inside your grill.
- Season the Grates Occasionally. Even after the first time, I like to season the grates every couple of months (or after deep cleans) to maintain that nonstick coating.
Consistency with these tricks will save you a lot of elbow grease.
What to Watch for: Signs Your Grill Needs Attention
Even if you follow a routine, a few clues mean your gas grill could use extra cleaning or a little repair. Watch out for these:
- Uneven flame or low heat, even with a full tank
- Excessive smoke coming from the firebox (aside from cooking smoke)
- Sticky or rusted grates that food clings to
- Flare-ups that weren’t a problem before
- A foul smell when you open the lid (old grease is never fun)
Tackling these issues fast keeps grill time relaxed and safe. Usually, just cleaning or replacing a drip pan, clearing a clogged burner, or reseasoning a rusty grate solves the issue. If rust keeps spreading, consider replacing the grates for safer, better grilling.
Easy BBQ Maintenance Schedule (Year-Round)
Trust me, building grill care into your regular schedule makes it easy. Here’s how I break it down for each season; modify as needed based on how often you cook outdoors:
- Every Use: Burn off, brush grates, empty grease tray, light wipe down
- Monthly: Check and clean burners, wipe out the firebox, replace the drip pan liners
- Every 1–2 Months: Deep cleaning: remove grates and soak, deep scrape, Oil, and reassemble
- Spring & Fall: Inspection: check hoses for leaks, test ignition, look for rust or wear, order replacement parts if needed
- Before Storage: If packing it away, clean thoroughly, cover, and store propane tanks separately in a safe spot
This kind of rhythm keeps everything convenient and low-stress.
Common Barriers to BBQ Cleanup (And How to Beat Them)
I totally get it. And in this perspective, the mess at the end of a cookout sometimes feels overwhelming. Here are a few common roadblocks I’ve noticed, with some simple ways to dodge them:
- Feeling too tired post-cook: I try to at least burn off the bits and brush the grates before calling it a day; major messes are way harder after everything dries and hardens.
- Worried about damaging grill parts: Most grates and burners are tough. Just avoid abrasive wire brushes if your grill guide warns against them, and let parts cool slightly before soaking to prevent warping.
- Not sure what to use: Mild dish soap, grill-safe degreasers, and nonabrasive sponges are your friends. Avoid oven cleaners, since they’re usually too harsh for most grill coatings.
- Forgetting regular checks: Setting a reminder helps! Even a quick phone alert once a month is a handy way to remember your deep-clean.
You’ll be surprised how much easier cleanup is when you break it into small, doable steps.
More Smart BBQ Cleanup Tips
- Spray grates quickly with water (with the flames off!) after burning off sticky bits. Steam helps loosen stuff, but don’t overdo it if your grill has enamel-coated parts.
- Baking soda and water paste scrubs away tough, greasy areas without scratching. Let it sit for five minutes before scouring for extra cleaning power.
- If the grates are removable, tossing them in your oven’s self-clean cycle (if the manual says it’s okay) can help with stubborn carbon buildup. Just be careful with finishes, and double-check your manual first.
- Store your grill tools and brushes nearby. You’re more likely to do a quick wipe or brush after each cook when everything you need is close at hand; out of sight, out of mind!
Try these small changes for a big improvement in your grill upkeep.
Real-World Example: My Quick 10-Minute Post-BBQ Routine
The trick for me has always been a 10-minute timer. I start by turning all the burners on high, closing the lid, and setting a timer for 5 minutes. While that’s running, I finish packing away leftovers and wiping the patio table. Once the timer goes off, I open the grill, give the grates a solid brush, and turn off the burners. After it cools for 5 minutes, I empty the grease tray and swap out the liner. Then, a quick wipe with a damp cloth on the lid and side tables, and the grill is ready until next time. Everything takes about as much time as tidying the kitchen.
FAQ: Gas Grill Cleanup & Maintenance Questions
Grill owners ask a lot of practical questions. I’ve collected a few that pop up all the time:
How often do I really need to deep-clean my gas grill?
I usually recommend every 1–2 months, or more often if you’re grilling several times a week. More frequent deep cleans keep flare-ups and odors away.
What’s the best way to prevent flare-ups?
Most flare-ups come from built-up grease or stuffed drip trays. Keeping these clean and checking for food chunks after every BBQ helps keep fire where it belongs (under your food, not all around it).
Should I use a grill cover?
Absolutely! A good grill cover shields against weather, leaves, wildlife visits, and dust, making each session hassle-free the next time around.
What’s the best Oil for seasoning grill grates?
I go with canola, grapeseed, or avocado oil because they have high smoke points and don’t gum up or create sticky residues. Sunflower oil is another solid pick.
How do I know if the burners need cleaning or replacing?
Low heat, weak flames, or patchy heating zones usually mean clogged burner tubes. If cleaning doesn’t fix it, or if you spot rust holes in the burners, replace them with new ones to restore even heat.
Practical Maintenance Investments
Besides the grill brush and basic cleaning supplies, a couple of accessories make gas grill cleanup even easier:
- Bristle-free grill brush or grilling stone. Safe and lasts longer.
- Disposable drip tray liners. Major timesaver for heavy grillers.
- Spray bottle for a water-or-vinegar mix. Handy for sticky grates.
- Grill cover. Adds years to your grill’s life by keeping out moisture and gunk.
- Tool hook or storage bin. Keeps cleaning brushes and tools close by, so you’re more likely to use them regularly.
Choosing a couple of these upfront is usually less expensive than replacing worn-out grill parts later, and helps your setup feel organized and ready.
“Heat it. Clean it. Oil it. Repeat.”
This simple phrase stuck with me years ago and totally works for gas grills: heat your grill to burn away debris, give it a clean, Oil the cooking surface before and after grilling, and repeat every time.
Here, sticking with this rule means you’re always just moments away from barbecue-ready grates, without ever facing a dreaded, greasy grill mess again. Simple habits pay off every single time you cook.
Overall, this guide explains why regular gas grill maintenance is essential for optimal performance, safety, and longevity. Neglecting care leads to grease buildup, poor heating, flare-ups, and difficult cleaning. The article covers:
- Importance of Maintenance: Regular cleaning prevents grease buildup, ensures even heating, and keeps grilling safe and enjoyable.
- Understanding Key Parts: Learn the role of grates, burner tubes, flavorizer bars, grease tray, and firebox—each requires specific attention during cleaning.
- Step-by-Step Cleaning Routines:
-
- Seasoning Before First Use: Wash, burn off any residues, and Oil the grates to protect them. Heat the grates to protect them.
- Pre-Grill Routine: Preheat, brush, and oil grates; check gas and burners.
- Post-Grill Cleanup: Burn off debris, brush the grates, empty the grease tray, and wipe the exterior.
- Deep Cleaning: Every 1–2 months, disconnect the gas, soak parts, scrape the firebox, clean the burners, and reassemble.
-
- Quick Tips: Use bristle-free brushes, drip pan liners, and a grill cover; season grates regularly; keep tools handy.
- Signs Your Grill Needs Attention: Watch for uneven heat, excess smoke, sticky grates, flare-ups, or odors—these signal it’s time for cleaning or repairs.
- Maintenance Schedule: Burn off and brush grates after each use, deep-clean every 1–2 months, inspect each season, and prep before storage.
- Overcoming Barriers: Address common obstacles, such as post-cooking fatigue, by adopting quick, consistent routines and using the right supplies.
- Pro Tips: Use water spray or baking soda paste for tough spots, self-clean oven cycles for removable grates, and store tools nearby.
- Real-World Routine: A 10-minute post-BBQ method ensures the grill is ready for next time with minimal effort.
- FAQs: Covers deep-cleaning frequency, preventing flare-ups, the best oils, burner maintenance, and the value of a grill cover.
- Recommended Accessories: Bristle-free brushes, drip pan liners, spray bottles, covers, and tool storage help streamline maintenance.
Yes, simple, key takeaway: “Heat it. Clean it. Oil it. Repeat.” Consistent, simple habits keep your grill in top shape and make every barbecue easier and tastier.
Enjoy that ‘great’ BBQ taste!